Creating a Photo Job for Volume Photography
In this section, we will walk you through how to set up your first job with GotPhoto. This guide was created specifically for volume use cases and their most common workflows. You can find the portrait photography guide here.
For a quick recap of our one time settings, click here.
Creating a photo job
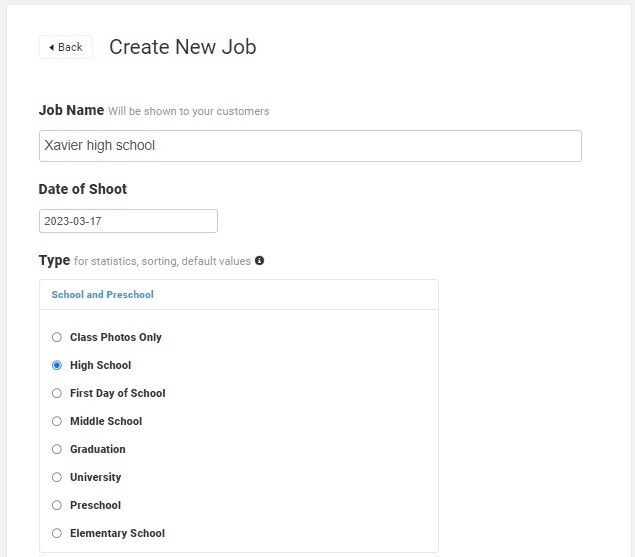
- Navigate to “Photo Jobs” and click the blue button “create new job” on the right
- Enter a job name (visible to customers) & date of shoot
- Select a job type which corresponds with your shoot
- Tip: The default settings (shoot method, price profile, communication profile, etc.) of a job type are automatically copied into the next job of the same type you create. If you have several shoots of the same type this can speed up your workflow.

Photo job settings
For school & preschool jobs select “Access code for each person” under “access type”. We primarily recommend two tagging methods for these kind of shoots:
- Simple QR-tagging without a list of names
- QR-tagging with list of names
In either case, each QR code connects to a private gallery, which is only visible to the person with the access code!
QR Tagging without a names list
When you don’t have student names or contact details yet, you can still successfully complete a job in GotPhoto. We recommend the following:
- Select how many QR cards you need for the shoot (1 QR code per student)
- Bring some extra QR cards (10% of original amount) in case some additional students show up to the shoot
QR tagging with list of names
QR tagging with list of names is what you will select when you have collected the students’ names and their parents’ contact information upfront.
- Copy the students’ data into our template
- Important: Do not fill out the “access code” row, the access codes will automatically be generated by the system after uploading the names list
- Upload the template via “upload file” button
- Print some extra access codes, in case some students that aren’t on the names list show up to the shoot
- For more information on how to upload names lists, please see our helpdesk article
- If you would like to offer potential buyers the option to select a favorite photo, e.g. for a yearbook, student ID card, etc. simply select the appropriate option in the drop down menu
How to upload a names list
Select a price profile
Either use one of our default profiles (view profiles with button “show profile”, after selection of price profile)
- See “Standard Preschool (lab)” price profiles
- See “Standard School (lab)” price profiles
Please ensure you have registered with the respective partner lab and have entered your customer ID here
Or create your own price profile, by building custom product packages & setting prices for your products
Set up coupons (recommended)
If you would like to offer your customers a coupon you can add it here.
- Coupons create a sales incentive for customers by offering a discounted basket value or free shipping.
- They trigger coupon emails within “Communication Profiles” to customers who’ve yet to make a purchase.
- This coupon will be active for the job, meaning every customer with access to the job, and its value is applied to the basket automatically – they won’t have to enter a code to receive the discount.
- If you’d rather give certain customers an individual voucher, we suggest using our “custom voucher” feature. You can set up a voucher for teachers e.g., to be used as a discount towards an order.
Archiving a job (recommended)
Archiving a job takes the photos in your shop offline. It’s important to set an archiving date because it also triggers communication emails to the customers informing them when their photos will no longer be available. This promotes a sense of urgency and usually generates more sales.
Select a Communication Profile
You can view the preset profiles by clicking the button “show profile” after selecting a communication profile. These are automated email and text messaging campaigns with multiple notifications that are linked to key events (triggers) within the job.
- Choose one of our default profiles or create your own (guide)
- Placeholders, marked by [[…]], like [[Customer.login]] will be replaced and tailored to the respective customer, e.g. the customer’s name, in the actual email being sent to the customer.
- Finally, press “save settings” to confirm.
Congratulations, you have successfully set up your first photo job!
We will send you further instructions on how to prepare for the shoot itself, once you get closer to the actual shoot date.
If you’d rather have a look now, feel free to click below:

Time for change
50%
Less admin work
100%
Happier parents and schools
100%
Satisfaction guaranteed for you or get your money back.*